Converting an Angular 1 App to Angular 2
If you’ve been using Angular for a while, then you probably already have production Angular 1 apps. Angular 2 is great, but there’s no way we can drop everything and rewrite our entire production apps in Angular 2. What we need is a way to incrementally upgrade our Angular 1 app. Thankfully, Angular 2 has a fantastic way to do that.
The interoperability of Angular 1 (ng1) and Angular 2 (ng2) works really well. In this chapter, we’re going to talk about how to upgrade your ng1 app to ng2 by writing a hybrid app. A hybrid app is running ng1 and ng2 simultaneously (and we can exchange data between them).
Peripheral Concepts
When we talk about interoperability between Angular 1 and Angular 2, there’s a lot of peripheral concepts. For instance:
Mapping Angular 1 Concepts to Angular 2: At a high level, ng2 Components are ng1 directives. We also use Services in both. However, this chapter is about using both ng1 and ng2, so we’re going to assume you have basic knowledge of both. If you haven’t used ng2 much, checkout the chapter on How Angular Works before reading this chapter.
Preparing ng1 apps for ng2: Angular 1.5 provides a new .component method to make “component-directives”. .component is a great way to start preparing your ng1 app for ng2. Furthermore, creating thin controllers (or banning them altogether) is a great way to refactor your ng1 app such that it’s easier to integrate with ng2.
Another way to prepare your ng1 app is to reduce or eliminate your use of two-way data-binding in favor of a one-way data flow. In-part, you’d do this by reducing $scope changes that pass data between directives and instead use services to pass your data around.
These ideas are important and warrant further exploration. However, we’re not going to extensively cover best-practices for pre-upgrade refactoring in this chapter.
Instead, here’s what we are going to talk about:
Writing hybrid ng1/ng2 apps: ng2 provides a way to bootstrap your ng1 app and then write ng2 components and services. You can write ng2 components that will mix with ng1 components and it “just works”. Furthermore, the dependency injection system supports passing between ng1 and ng2 (both directions), so you can write services which will run in either ng1 or ng2.
The best part? Change detection runs within Zones, so you don’t need to call $scope.apply or worry much about change-detection at all.
What We’re Building
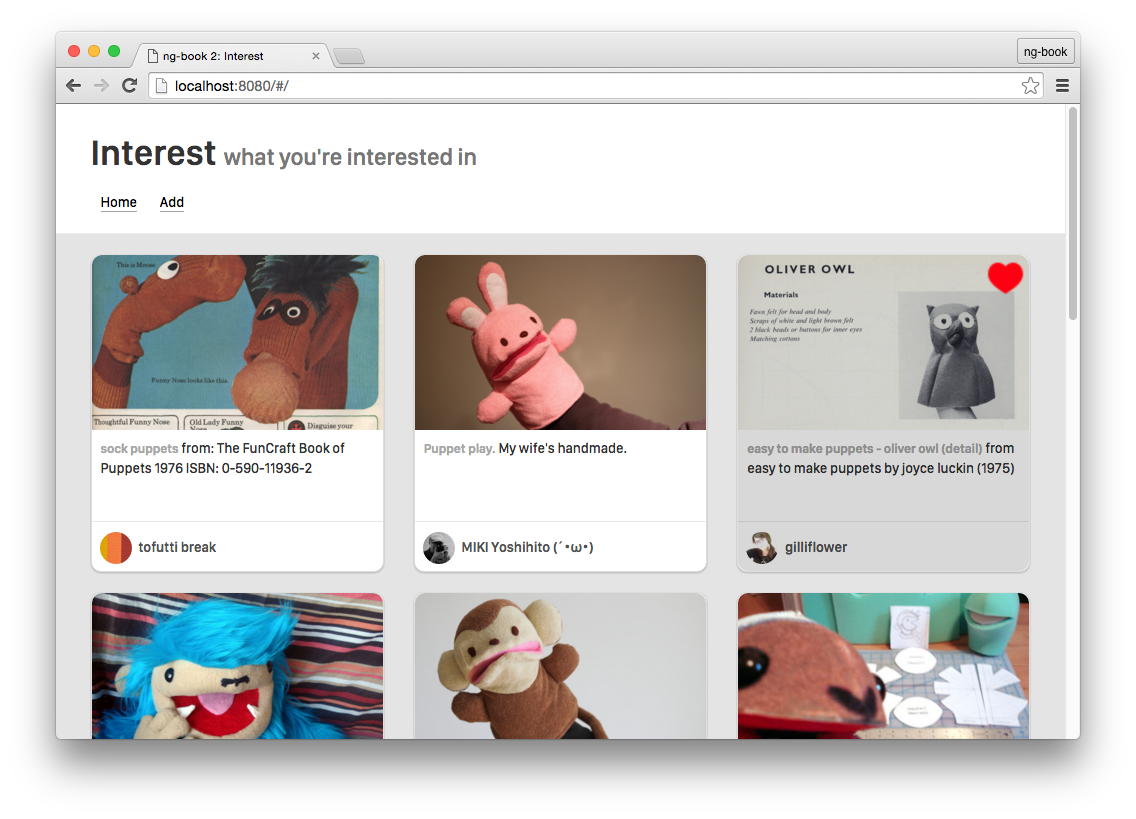
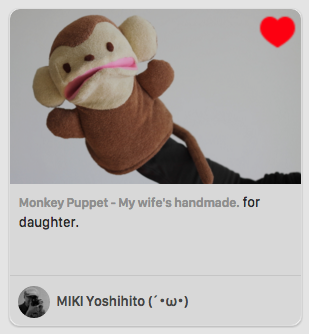
In this chapter, we’re going to be converting an app called “Interest” - it’s a Pinterest-like clone. The idea is that you can save a “Pin” which is a link with an image. The Pins will be shown in a list and you can “fav” (or unfav) a pin.
You can find the completed code for both the ng1 version and the completed hybrid version in the sample code download under code/conversion/ng1 and code/conversion/hybrid
Before we dive in, let’s set the stage for interoperability between ng1 and ng2
Mapping Angular 1 to Angular 2
From a high level, the five main parts of Angular 1 are:
- Directives
- Controllers
- Scopes
- Services
- Dependency Injection
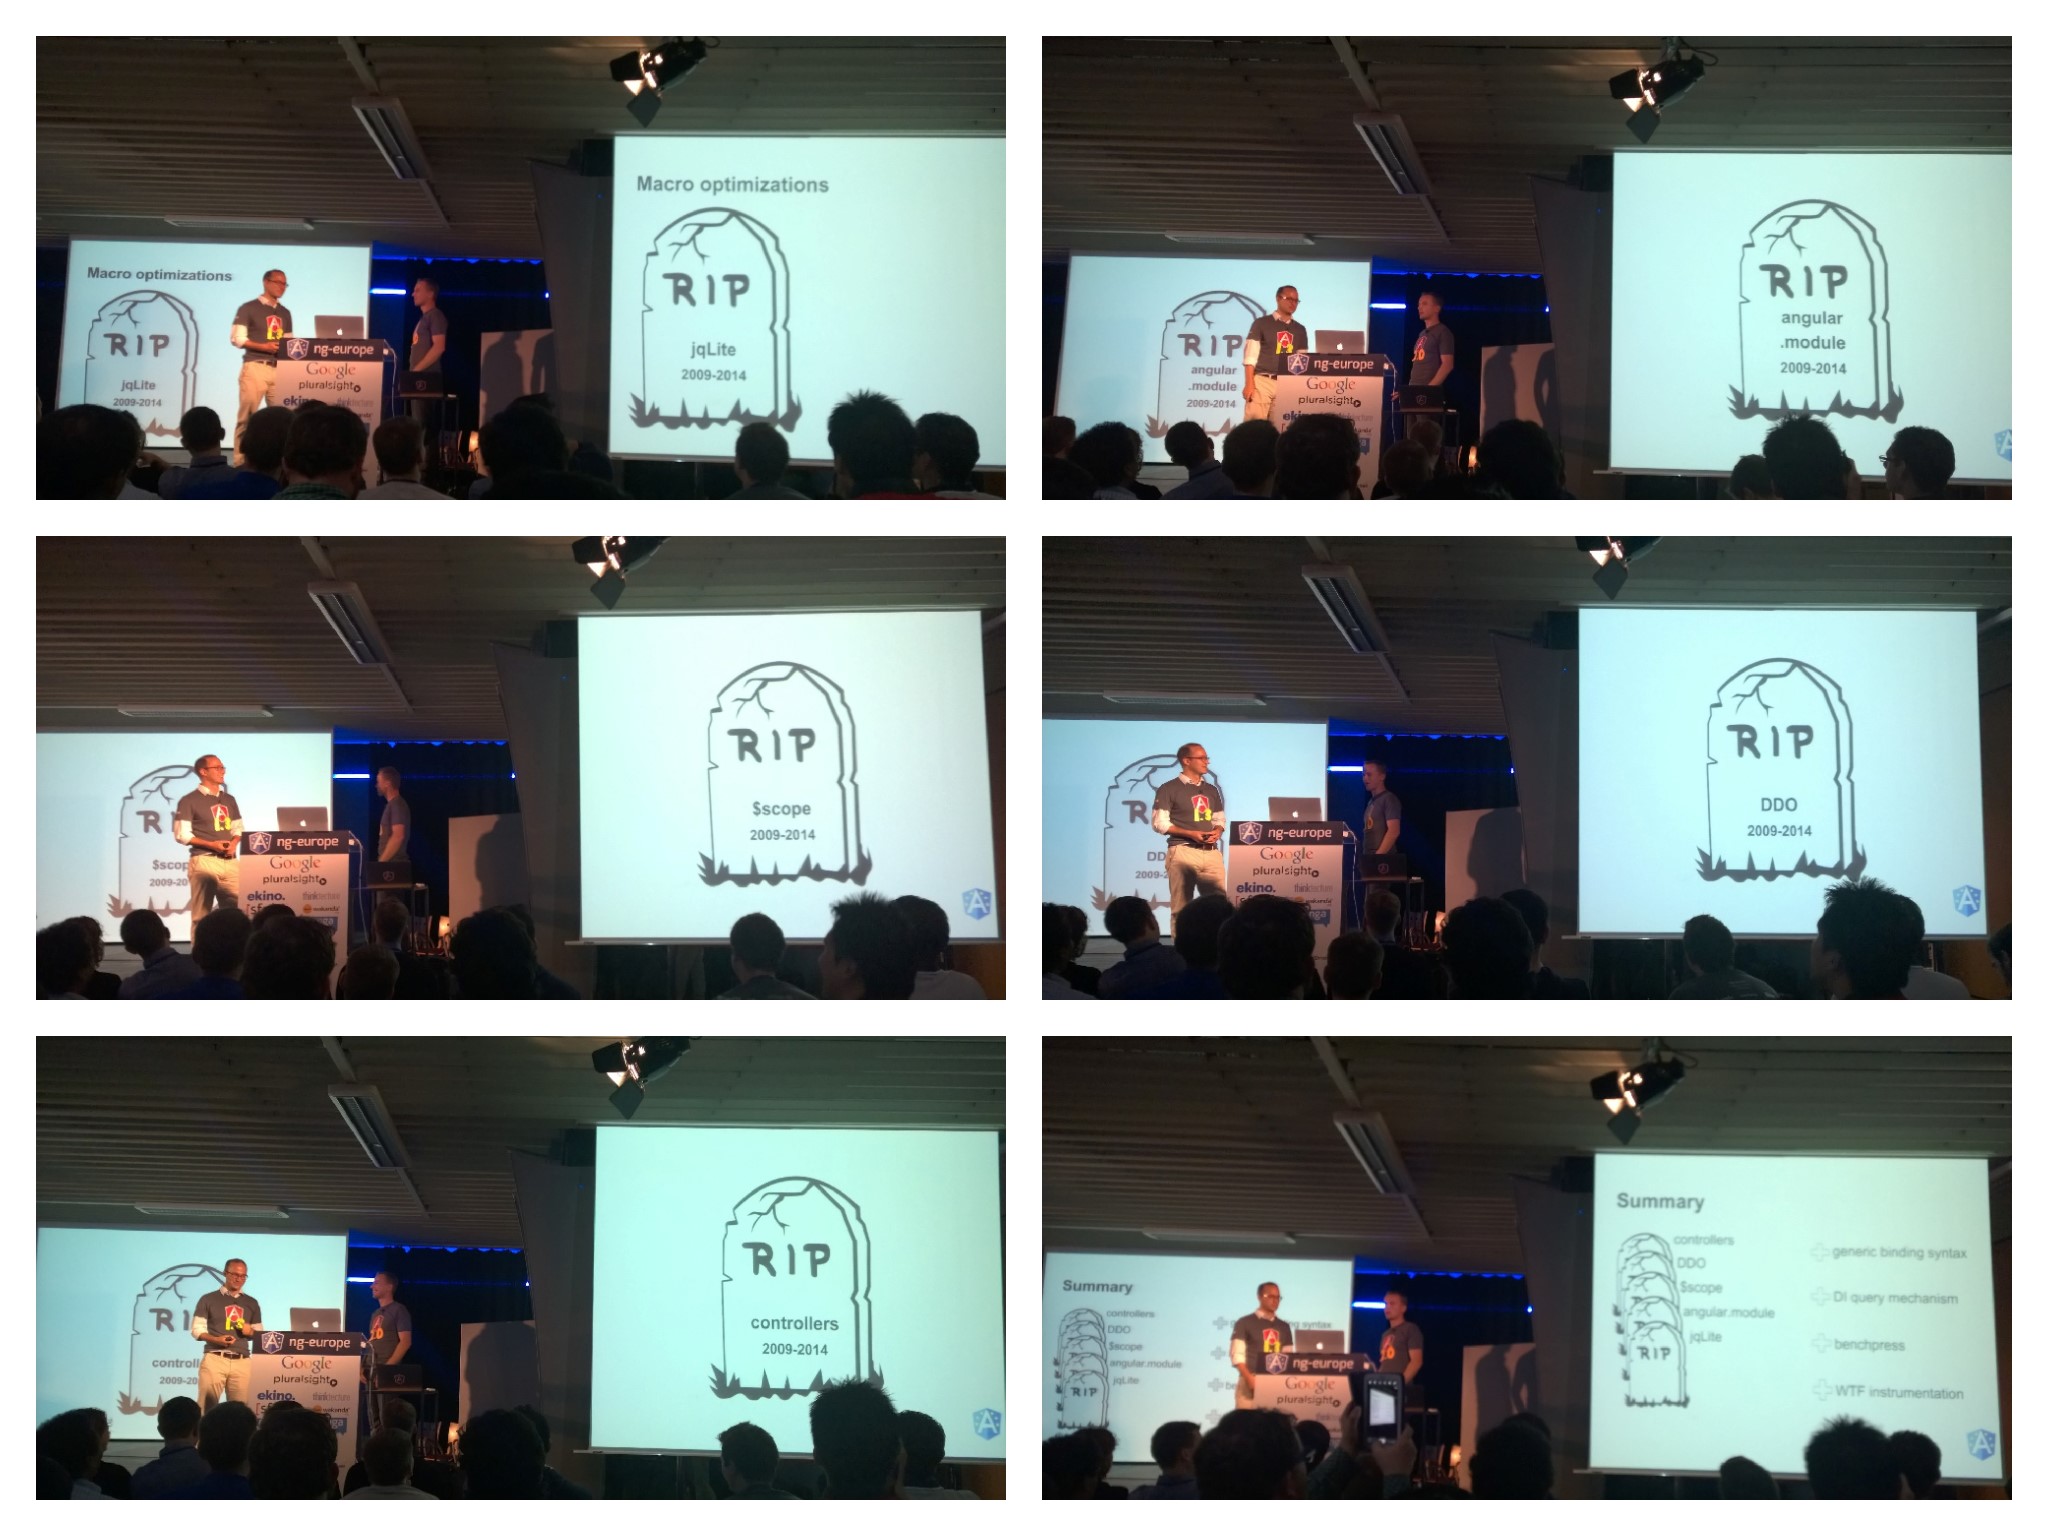
Angular 2 changes this list significantly. You might have heard that at ngEurope 2014 Igor and Tobias from the Angular core team announced that they were killing off several “core” ideas in Angular 1 (video here). Specifically, they announced that Angular 2 was killing off:
$scope (& two-way binding by default)- Directive Definition Objects
- Controllers
angular.module
As someone who’s built Angular 1 apps and is used to thinking in ng1, we might ask: if we take those things away, what is left? How can you build Angular apps without Controllers and $scope?
Well, as much as people like to dramatize how different Angular 2 is, it turns out, a lot of the same ideas are still with us and, in fact, Angular 2 provides just as much functionality but with a much simpler model.
At a high-level Angular 2 core is made up of:
- Components (think “directives”) and
- Services
Of course there’s tons of infrastructure required to make those things work. For instance, you need Dependency Injection to manage your Services. And you need a strong change detection library to efficiently propagate data changes to your app. And you need an efficient rendering layer to handle rendering the DOM at the right time.
Requirements for Interoperability
So given these two different systems, what features do we need for easy interoperability?
-
Use Angular 2 Components in Angular 1: The first thing that comes to mind is that we need to be able to write new ng2 components, but use them within our ng1 app.
-
Use Angular 1 Components in Angular 2: It’s likely that we won’t replace a whole branch of our component-tree with all ng2 components. We want to be able to re-use any ng1 components we have within a ng2 component.
-
Service Sharing: If we have, say, a UserService we want to share that service between both ng1 and ng2. Services are normally plain Javascript objects so, more generally, what we need is an interoperable dependency injection system.
-
Change Detection: If we make changes in one side, we want those changes to propagate to the other.
Angular 2 provides solutions for all of these situations and we’ll cover them in this chapter.
In this chapter we’re going to do the following:
- Describe the ng1 app we’ll be converting
- Explain how to setup your hybrid app by using ng2’s
UpgradeAdapter
- Explain step-by-step how to share components (directives) and services between ng1 and ng2 by converting the ng1 app to a hybrid app
The Angular 1 App
To set the stage, let’s go over the Angular 1 version of our app.
This chapter assumes some knowledge of Angular 1 and ui-router. If you’re not comfortable with Angular 1 yet, check out ng-book 1.
We won’t be diving too deeply into explaining each Angular 1 concept. Instead, we’re going to review the structure of the app to prepare for our upgrade to a ng2/hybrid app.
To run the ng1 app, cd into conversion/ng1 in the code samples, install the dependencies, and run the app.
cd code/conversion/ng1  # change directories
npm install             # install dependencies
npm run go              # run the app
If your browser doesn’t open automatically, open the url: http://localhost:8080.
In this app, you can see that our user is collecting puppets. We can hover over an item and click the heart to “fav” a pin.
We can also go to the /add page and add a new pin. Try submitting the default form.
Handling image uploads is more complex than we want to handle in this demo. For now, just paste the full URL to an image if you want to try a different image.
The ng1-app HTML
The index.html in our ng1 app uses a common structure:
    <!DOCTYPE html>
    <html ng-app='interestApp'>
    <head>
      <meta charset="utf-8">
      <title>Interest</title>
      <link rel="stylesheet" href="css/bootstrap.min.css">
      <link rel="stylesheet" href="css/sf.css">
      <link rel="stylesheet" href="css/interest.css">
    </head>
    <body class="container-fullwidth">

      <div class="page-header">
        <div class="container">
          <h1>Interest <small>what you're interested in</small></h1>

          <div class="navLinks">
            <a ui-sref='home' id="navLinkHome">Home</a>
            <a ui-sref='add' id="navLinkAdd">Add</a>
          </div>
        </div>
      </div>

      <div id="content">
        <div ui-view=''></div>
      </div>

      <script src="js/vendor/lodash.js"></script>
      <script src="js/vendor/angular.js"></script>
      <script src="js/vendor/angular-ui-router.js"></script>
      <script src="js/app.js"></script>
    </body>
    </html>
This page is a preview of ng-book 2.
Get the rest of this chapter plus hundreds of pages Angular 2 instruction, 5 sample projects, a screencast, and more.
Ready to master Angular 2?
- What if you could master the entire framework – with solid foundations – in less time without beating your head against a wall? Imagine how quickly you could work if you knew the best practices and the best tools?
- Stop wasting your time searching and have everything you need to be productive in one, well-organized place, with complete examples to get your project up without needing to resort to endless hours of research.
- You will learn what you need to know to work professionally with ng-book 2: The Complete Book on Angular 2 or get your money back.
Download the First Chapter (for free)