Connecting Your MCP Server to Claude for Desktop
This lesson preview is part of the MCP in Practice: The Future of AI Agents course and can be unlocked immediately with a \newline Pro subscription or a single-time purchase. Already have access to this course? Log in here.
Get unlimited access to MCP in Practice: The Future of AI Agents, plus 90+ \newline books, guides and courses with the \newline Pro subscription.
[00:00 - 00:09] Okay, let's keep it moving forward. Next part is actually the whole site because we finally built everything, heck how to use it, right?
[00:10 - 00:21] First thing that I want to address about the host right now, that we're using a lot for desktop. This is actually the local version.
[00:22 - 00:28] Why is it for now? It's not that easy for us to run on our MCP servers online on the web.
[00:29 - 00:33] It's going to be changed and addressed really soon. Hey, Max from the future here.
[00:34 - 00:39] Turns out it's already being addressed. One of the first platforms to enable this feature was CloudFare.
[00:40 - 00:52] Right now it's already pretty solid. But besides CloudFare, there are other Cloud platforms which start to embrace MCP, including AWS, Google Cloud Platform and Microsoft Azure.
[00:53 - 01:09] So if you hear something from the list that you're using, congratulations, you should already have access to host your MCP server. But for the simplicity of our current lesson, let's stick with the local version.
[01:10 - 01:20] So for us, it would be easier to understand and set up. But please, if you want, go ahead and you can continue and try to deploy your server on the Cloud.
[01:21 - 01:42] But the most easy way for you to show how actually everything working and how everything being set up in the hood is the local version. So if you want to test it out, just download Cloud4 Desktop once again, since Cloud is developed by Intropic, they have the best compatibility with the MCP.
[01:43 - 01:46] And it's quite easy to set up and to use. So play around with it.
[01:47 - 02:03] And then if you want, you can actually test and check the other host as well. But for example, I recently had been checking the carcer and they have changed two times the way how you connect the MCP server to their platform.
[02:04 - 02:14] So right now, Cloud4 Desktop is one of the most stable platforms and the most predictable one. Since there's new, once again, there will be quite a lot of changes.
[02:15 - 02:29] And eventually, actually also change the way how you connect the MCP server to the same way how we are doing this in the Cloud for next. So please know about the restrictions in terms of running hosting, for example, your server on the web and running it.
[02:30 - 02:42] It's like right now, not that easy to do and complicated. I thought that some guys already are doing it, but really soon, the way how you're doing may change drastically and it became much more easier.
[02:43 - 02:52] So that's why I'm not trying to clutter you with the extra necessary information. Once again, step by step, trying to understand all the main basic and built-in blocks in our case.
[02:53 - 03:05] So here we downloaded the Cloud client, okay, for the desktop, guys. But what we are doing, how we would let the client know about our server.
[03:06 - 03:18] First thing that we are doing, we're going to Cloud and we're just clicking the settings. Inside of the Cloud settings, once they're opened, we from the general, we need to click on the developer.
[03:19 - 03:38] And here we will set up the connection to our server. Since it would be a little bit messy right now, if I start to show you like different parts, how to connect it using my own system router, let's jump back for now to the presentation.
[03:39 - 03:47] And I actually will show you the like slide example, but we will go back and just in part, just don't worry about it. So clicking settings and open the developer.
[03:48 - 03:56] If you don't have any MCP server connected, you will have this window. In our case, we have this window because I recently been testing them applications.
[03:57 - 04:03] So it would be easier for me and quicker for me to show we how everything was working. So that's why we have here.
[04:04 - 04:09] But back to our slides, okay. What we need to do here is just to click edit config.
[04:10 - 04:24] After clicking edit config, it will open for us the our system brother with different files. It will specifically open files related to the and folder related to the cloud for desktop for the desktop.
[04:25 - 04:31] And it will automatically actually highlight the file that you need to open. It's called cloud desktop config.json.
[04:32 - 04:44] So you're not gonna miss it. What you want to do with it, just click and open it in idea of your choice for the easier way and faster way for updating it.
[04:45 - 04:52] And then you need to provide the configuration for this client so we can connect to our server. Nothing to scary.
[04:53 - 04:58] This is all included inside of the official documentation. No worries about that.
[04:59 - 05:07] But to quickly go over it, first we're just, this is not that way. We're just calling the MCP servers because there might be multiple of them.
[05:08 - 05:11] Then we are giving the name for our server. It's not necessary, okay.
[05:12 - 05:23] But preferably let's try to keep the naming the same on your client side and they own your server side. You can name it, I don't know, spongeable or something like that.
[05:24 - 05:37] It doesn't matter because I explained like in a second why, but let's try to keep everything consistent because trust me, you will need it in the future later. Then we are actually telling what type of the command we are going to use to run this server.
[05:38 - 05:50] In our case since we're using JavaScript, it's going to be not. If you're using Python or you're using some other languages, it's going to change from language.
[05:51 - 05:56] It will be inside of the documentation. Just once again, click to the needed language for you.
[05:57 - 06:09] And at the bottom, you would be able to see the way how you need to construct this configuration file. And then as the arguments, we are providing path to our server, our build file.
[06:10 - 06:20] So this is how actually it's been connected. We're just providing local path to it and in the future, it would be a online path to whatever we are using and it's basically connected.
[06:21 - 06:36] And after we have set it up the connection and everything is set-ifed, we are closing this file key. And the most important part with guys be careful not just like me because on this screenshot, you can see I have added another symbol.
[06:37 - 06:54] So it's not going to work if you're going to use this way, you need to delete this. And if you want to easily grab the bus just in case, I want to show you just right click, copy bus and it would copy a bus to your file, just paste it here super easy, super quickly.
[06:55 - 07:04] Everything is basically done. The only issues the cloud server right now is that you need to restart it completely after you have changed the configuration file.
[07:05 - 07:14] So don't forget to completely close it and reopen it again, okay? After that, there are two options that you might see.
[07:15 - 07:34] In my case, I'm simply lately started to behave in not really a good manner and it might give you an error about, hey, I cannot connect to your server. This is completely file, we'll address it in a second, but let's imagine that everything won't as planned, but you're going to see how you would know that everything is connected.
[07:35 - 07:50] Here you're able to see this like a Hummer single and it says two MCP tools available. This means that it is connected and it automatically recognized it and it shows us information about this tool.
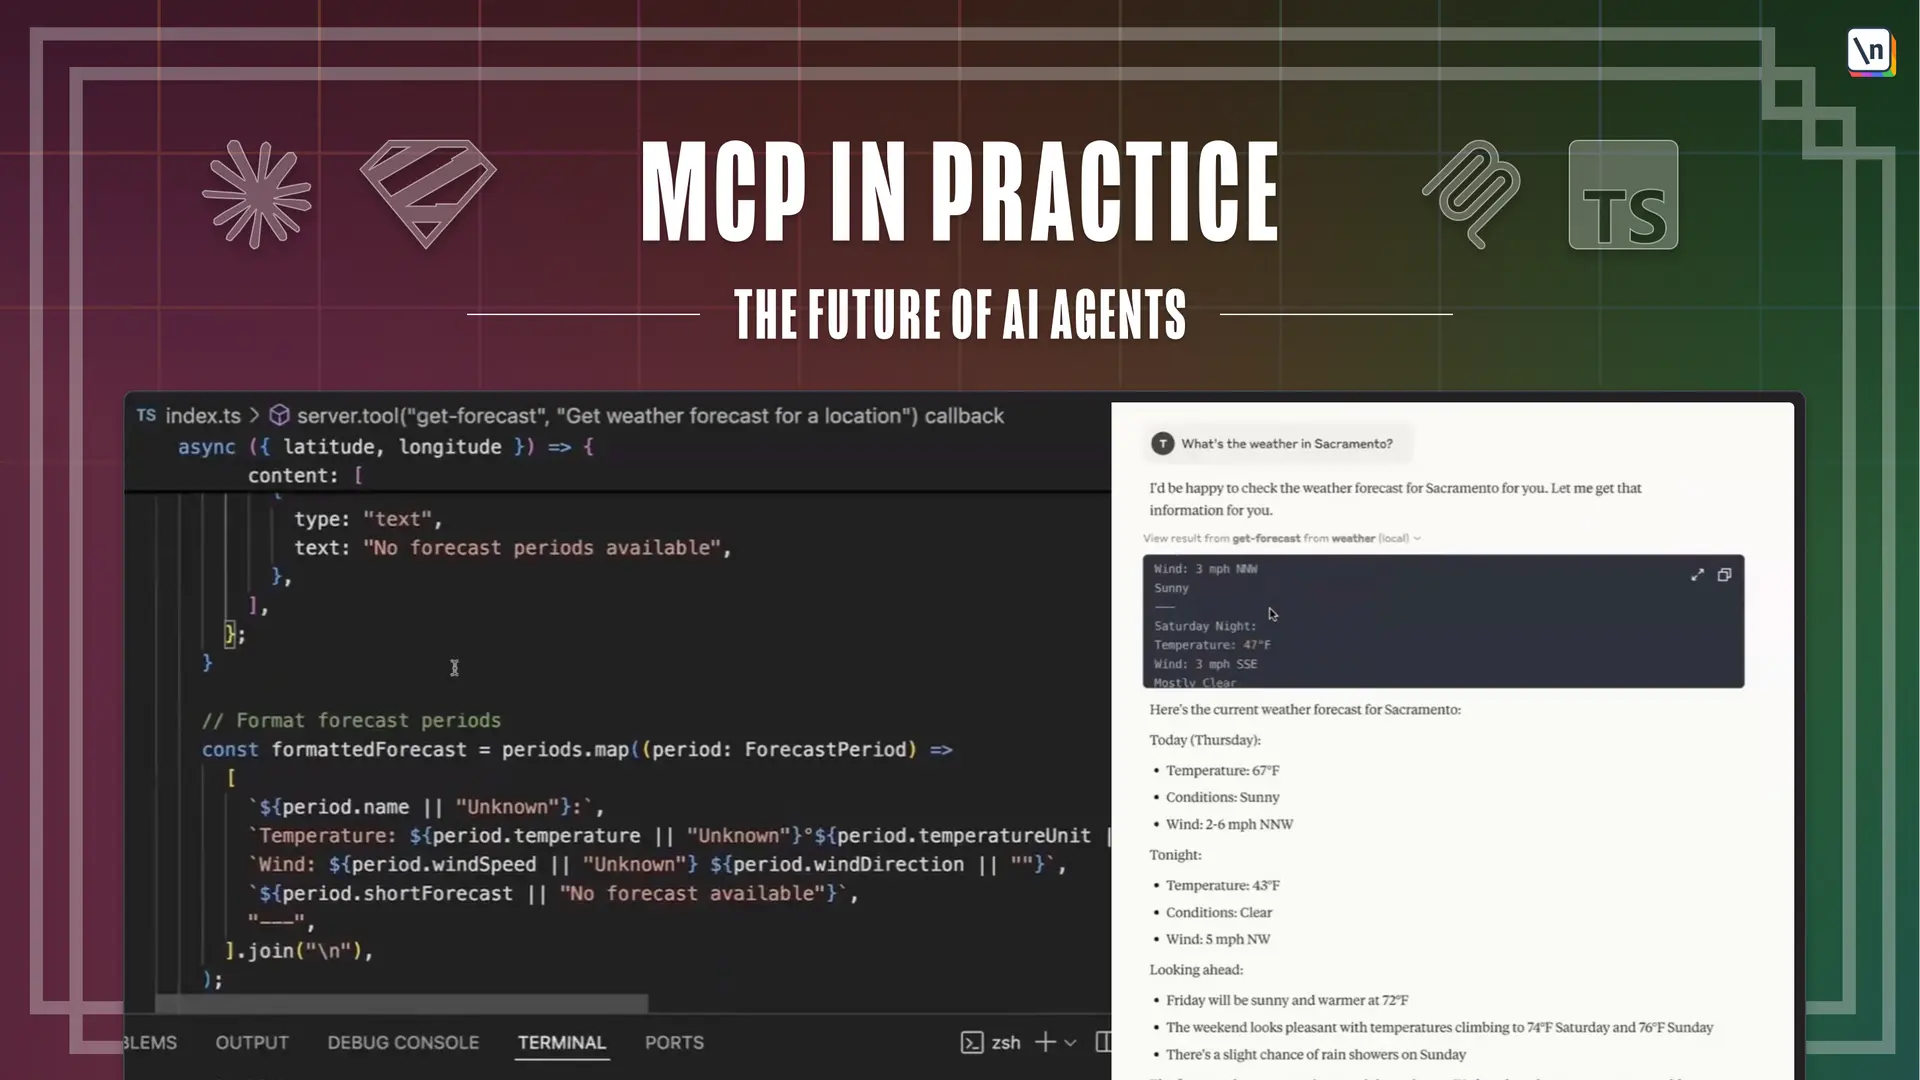
[07:51 - 08:14] So you can actually click on it and you can see that we have two different features, tools that we are using in our application, we built only one tool, but for this case, I built two just to test everything out of the additionally and what we have created get forecast. Let's forget about get alerts, the principle is just the same for the simplicity purposes, we're going to use only get forecast and that's it.
[08:15 - 08:26] This way, we know that everything is built and everything is working correctly. After that, we can ask a question about the weather, for example, for example, what's the weather in Sacramento?
[08:27 - 08:34] Yeah, this is one of them. My test question that I've been using, let me paste it here, what was in Sacramento, let's...
[08:35 - 08:41] You're, oh my God, when I was testing guys, Jesus Christ, this is unacceptable, let's reload it. Okay, now it's running.
[08:42 - 08:54] It's not as planned as usually, you know that. (laughing) But this is the error that you might see if you're connecting your server and you might think that something went wrong, okay?
[08:55 - 09:02] Let go back to the actually settings. Right now, you can see that weather fails for some reason, but application is built correctly.
[09:03 - 09:19] This assumption I'm against from the MCP side and the closed side that are fixing it right now, but in my case, some guys don't have this issue. Specifically for my environment, I have this issue and I'm really glad that I had this because I can share with you.
[09:20 - 09:43] I have spent so many hours trying to deduct what the hell have happened and why the official documentation doesn't work, why it's just breaking and turns out that there's no consistency in it, right? It's just because we need to reload these server multiple times until the cloud host would decide suddenly that it's okay with whatever setting gun setup we have provided and it's ready to go and ready to work.
[09:44 - 09:50] You don't need to completely reload application in this case. You can just click command or control error, boom.
[09:51 - 09:55] You sent this, okay? Boom, almost running.
[09:56 - 10:02] Let's keep on hitting this again and again. Finally, finally.
[10:03 - 10:13] Yeah, guys, that was devastating performance. When I first tried to use it to debug it, but basically reload it a couple of times and it will be good to go.
[10:14 - 10:28] Next, let's actually try and run it finally and what's better in second mind. Initially had to reload the page because while testing, I have used all the cloud free tier and after some time, I have to run it.
[10:29 - 10:32] And after some time, it just re-enabled. So let's ask the big question.
[10:33 - 10:48] Whenever you're running the cloud host and your server connected, it will ask you actually, can we use whether or not our server? This is just for security reason.
[10:49 - 10:55] Just click "Ode" for this chat. It means that we are allowing to use our server that everything is safely and everything is all right.
[10:56 - 11:04] And boom, here's the magic is happening. It gives us the weather from the Sacramento in our case.
[11:05 - 11:13] If we click "View Results" for more additional details, we can actually see what is going on the inside the hood, right? Results from get forecast.
[11:14 - 11:20] This is the tool that we have just written recently. From weather server that we have built recently.
[11:21 - 11:27] And here's a lot of longitude, latitude and longitude. Here's the forecast for this coordinates.
[11:28 - 11:41] This is the temperature, like for today, for tonight, and all the details that we have formatted before descending it out right. And this is what actually the host receives from the server side.
[11:42 - 11:48] Okay. It just receives a bunch of text and then LLM already deducts it.
[11:49 - 11:56] And after that, it's super easy for the LLM to figure out and give us the response. That basically it.
[11:57 - 12:05] You only need to have the supported host. And super easily you can build and connect the server to it.
[12:06 - 12:15] And basically the rest is just magic. It just automatically deducts that you need to use exactly our server using our description.
[12:16 - 12:20] It creates connection to it. And guys, once again, I have not started the server.
[12:21 - 12:26] Okay. Let's not forget that I only have build file here. Server is not running.
[12:27 - 12:36] But if you're curious, you can actually test it out for yourself. One of the way I was losing my mind when I was trying to debug this, about when it's not running for some reason.
[12:37 - 12:43] Okay. I was actually going back to the application and just trying to run the build file myself locally.
[12:44 - 12:47] So just click nodes. It's built and it's indexed.js.
[12:48 - 12:50] Okay. So I'm reading, have I missed something?
[12:51 - 12:59] Let me see. Maybe something won't be the part, but basically it will show the application is running.
[13:00 - 13:08] Hey, Max from the future here. The reason why our application is not running right now, it's because after creating the application, we forgot to build it.
[13:09 - 13:23] So the changes would apply. That's why if you run npm run build after setting everything up, then you would have your application built inside of the index.js file and there would be no issues on your side.
[13:24 - 13:39] What I want to actually point out that you can just run and build it locally before even connecting to the mcp host, just run the build file no matter the language you're using and you would see basically the build that it is running. If there is some issue with it, you would see the error.
[13:40 - 13:46] But if there is no error with your application, you're connecting to the host side. Just try to reload it a couple of times.
[13:47 - 13:52] Usually it helps out. In case if there is still an error, let's reload it once again.
[13:53 - 13:57] Okay, it's failed again. As expected.
[13:58 - 14:05] Whatever there is still error once you can open logs. For now, I'm not going to click it because you will not be able to see anything .
[14:06 - 14:19] But when you're opening the logs, you would see the file with different logs saved on your, in our case, in our local PC machine because we're using everything locally. And this is how you can debug it furthermore.
[14:20 - 14:33] So if you ever get stuck, make sure that your application just running locally with a node, run your application. If everything correct there and something is failing here, try to reload a couple of times if something is failing there.
[14:34 - 14:46] Just go to logs, open the file and read the logs. Whatever you have logged on the server side, just copy, base this message just to easily see what is going on and what is going on.
[14:47 - 14:58] So this is, here's the additional small debugging session for your cloud to manage and to work with it. But it's in general just fairly simple to use and to set everything up.
[14:59 - 15:06] That was a lot of talking. But basically I have covered all the main parts for you.
[15:07 - 15:21] Let's go over again, just one more time. We are building the server using either tools, either resources, or we are using the prompts.
[15:22 - 15:30] Wrapping up inside of some of the logic that we need, we name stuff correctly. And then we are just creating the transport layer connection.
[15:31 - 15:44] And basically that's it. So you can easily modify your existing servers, which are performing some tasks , to be able to work with the client side and to perform the job that you need.
[15:45 - 15:59] The most important part, don't forget that you need to type your inputs correctly so no, no is how to actually what to give you as the input. Otherwise, say my like house and eight, do something like that.
[16:00 - 16:07] But on the high level stuff, that's it. Then we just connected with a couple of clients, the codes providing past to whatever we want.
[16:08 - 16:14] After a couple of debarks, we just can use and ask questions and just response to us.